In our previous discussions, we have covered what is AngularJS, basic building blocks, Dependency Injection, and Routing in AngularJS. For a user to log in, he should have credentials (username and password) with him. The credentials can be obtained after completing the registration process. The following link explains the registration process in AngularJS. In this post, we are going to discuss how a login form works in AngularJS. Form validations can be done in two ways in AngularJS. Validations using ngMessages and Angular directives, Properties, and attributes.
In this example, we have a simple login page. Whenever a user enters a username and password, they will be authenticated and redirected to a home page on success. If authentication fails, the user is notified with an error message.
Before we start implementing any application, it is a best practice to design the directory structure for an application so that anyone can easily understand it. Following is the directory structure for this Simple Login Example in AngularJS.
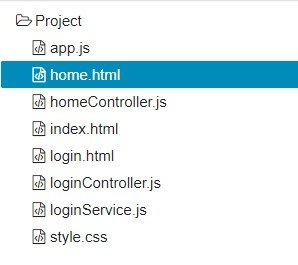
As we can see above, we have a base shell index page, login page, and its controller and the same follows for the home page.
When a user enters login credentials and clicks on the login button, the request is authenticated in the loginService.js file and if authentication is successful, he will be redirected to the Home.html page. If authentication fails, he will be blocked on the login page and notified with an error message and the user will be asked to enter the correct credentials.
Other Applications in AngularJS:
We have the main base page i.e. index.html where all other views are loaded. The following code explains the index page. Base script files that are required to run an application, are loaded when the application is bootstrapped.
index.html
<!doctype html>
<html ng-app="myApp" >
<head>
  <meta charset="utf-8">
  <title>AngularJS Plunker</title>
  <script>document.write('<base href="' + document.location + '" />');</script>
  <link href="//netdna.bootstrapcdn.com/twitter-bootstrap/2.3.1/css/bootstrap-combined.min.css" rel="stylesheet">
  <link rel="stylesheet" href="style.css">
  <script src="http://code.angularjs.org/1.2.13/angular.js"></script>
  <script src="//cdnjs.cloudflare.com/ajax/libs/angular-ui-router/0.2.8/angular-ui-router.min.js"></script>

  <script src="app.js"></script>
  <script src="loginController.js"></script>
  <script src="homeController.js"></script>
  <script src="loginService.js"></script>
</head>
<body>
  <div class="container" width="100px">
      <h2>AngularJS Simple Login Example</h2>

      <div ui-view></div>
  </div>
</body>
</html>
Now, we need a javascript to hold all the configuration details required for an application to run. In this file, we configure the routes for an application which is done using the UI Router.
app.js.
(function() {
  var app = angular.module('myApp', ['ui.router']);

   app.run(function($rootScope, $location, $state, LoginService) {
     console.clear();
     console.log('running');
    if(!LoginService.isAuthenticated()) {
        $state.transitionTo('login');
      }
  });

  app.config(['$stateProvider', '$urlRouterProvider',
  function($stateProvider, $urlRouterProvider) {
    $stateProvider
      .state('login', {
        url : '/login',
        templateUrl : 'login.html',
        controller : 'LoginController'
      })
      .state('home', {
        url : '/home',
        templateUrl : 'home.html',
        controller : 'HomeController'
      });

       $urlRouterProvider.otherwise('/login');
  }]);

})();
Next, we will have the views to be loaded on the index page. So firstly it’s the login page. In the login page, we have two simple fields to be entered. They are UserName and Password. Also, we have a login button.
login.html
<div class="col-md-12">
      <p><strong>Login Page</strong></p>

      <form ng-submit="formSubmit()" class="form">
        <div class="col-md-4">
          <div class="form-group">
            <input type="text" class="form-control" ng-model="username" placeholder="username" required=""/>
          </div>

          <div class="form-group">
            <input type="password" class="form-control" ng-model="password" placeholder="password" required=""/>
          </div>

          <div class="form-group">
            <button type="submit" class="btn btn-success">Login</button>
            <span class="text-danger" style="color:red">{{ error }}</span>
          </div>

        </div>
      </form>
</div>
The login page has its own controller to hold the business logic. This is a simple javascript file created specifically for login.html where all its functions and logic are included.
loginController.js
var app = angular.module('myApp');
 app.controller('LoginController', function($scope, $rootScope, $stateParams, $state, LoginService) {
    $rootScope.title = "AngularJS Login Sample";

    $scope.formSubmit = function() {
      if(LoginService.login($scope.username, $scope.password)) {
        $rootScope.userName = $scope.username;
        $scope.error = '';
        $scope.username = '';
        $scope.password = '';
        $state.transitionTo('home');
      } else {
        $scope.error = "Incorrect username/password !";
      }
    };
  });
Next, we will implement the home page (home.html) which will be loaded once the user is successfully logged in. Here, we have simple statements and the logout button to sign out from an application.
home.html
<div class="col-md-12" style="width:500px;">
    <div align="right"><a ui-sref="login">Logout</a></div>
      <h4>Welcome {{user}}! </h4>
      <p><strong>This is Home Page</strong></p>
 </div>
As we had a separate controller for the login page, similarly we will have a separate controller for the home page. You can see the code for the controller page below.
homeController.js
var app = angular.module('myApp');

  app.controller('HomeController',
  function($scope, $rootScope, $stateParams, $state, LoginService) {
    $scope.user = $rootScope.userName;
  });
Since we are showing the username of who is logging in to the application, we are storing it in the scope object and binding it to the variable.
As we have said above, we authenticate the user after the user enters credentials and clicks on the login button. This is done in the loginService.js file.
You can see the implementation details for loginService.js as shown below. We have preassumed the user credentials to be admin and password. We need to make use of the database server to authenticate the user with his/her registered credentials.
loginService.js
var app = angular.module('myApp');

  app.factory('LoginService', function() {
    var admin = 'admin';
    var pass = 'password';
    var isAuthenticated = false;

    return {
      login : function(username, password) {
        isAuthenticated = username === admin && password === pass;
        return isAuthenticated;
      },
      isAuthenticated : function() {
        return isAuthenticated;
      }
    };
  });
Now you might be thinking why we have done this logic in the service file, we could have done it in the loginController page itself. So to answer this thought, Yes, you are perfectly right. We could have done it in the loginController itself. But, one important thing is, as you know services are created to separate the logic from the controller so that it can be reused. In the same way, we have created a separate service to implement the authentication logic so that it can be reused when required.
The outputs of the login application are shown below.
Below the login form is displayed initially when the application is loaded.

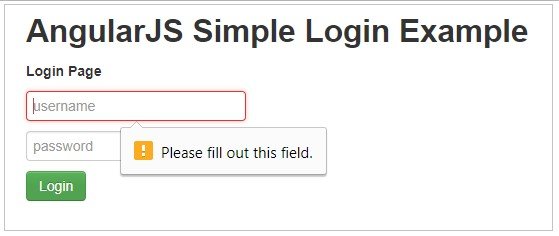
If the user does not enter the fields and tries to click on the login button, the page notifies him about the required fields. It gives a message as shown in the below image.
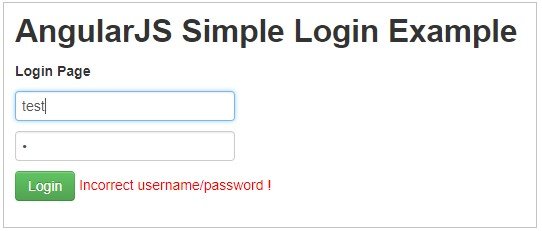
If the user enters the wrong credentials, the error message is displayed in red color as shown below.
If the user enters the correct credentials, the user is authenticated. Once the authentication is successful, the user will be redirected to the home page as shown below.
If the authentication fails, he will remain on the login page and an error message is displayed on the page.
The home page has a Logout link to log out from an application. The home page looks as shown below.

Conclusion:
AngularJS makes life easy for developers. You can try out the above example and experience the simplicity involved in this.
Hi sir, after completing all steps how to run in localhost
From login page after submitting the form i am not redirection to home page .
Hi Kanika,
Did you follow all the steps?
i am seeing only AngularJS Simple Login Example, when i open the index page. I am not really sure what’s going wrong. Can somebody guide me through…
Hi,
Yes, I am able to see the whole article. Could you please clear the cache and check. Or even incognito mode may help you.
can you add the style css also?
Hi Saloi,
Thanks for the heads up.
But it should work with bootstrap CSS alone.
Let me check and add it.
How to Run This Downloaded Github File
Hi,
Did you ever add the steps to add the bootstrap dependncies?
Steps not mentioned by me anywhere. Just include them in your project directories and provide the relative path.
upload to the github and share link to everyone
I have added bootstrap dependencies myself.. But I guess ui-view rendering is not happening.. What are all the steps to do that?
If you use online bootstrap, you would need internet for it to work otherwise download all the dependencies and include local references
how to run this application
You can run it through any browser but you would have to add bootstrap dependencies as well. I will add the steps for this.
how to run this aplplication?
Hi,
You can use visual studio for the same. The first time it needs connection to the internet to download bootstrap dependencies.
Comments are closed.